Building IoT Devices with Embedded Rust - Intro
In this book, we will learn about IoT development using Rust. For this, we will use the ESP32-C5. You will learn how IoT devices communicate over networks, work with sensors, exchange data with other systems using protocols such as MQTT, update firmware over the air (OTA), and work with other common IoT technologies. We will build hands-on examples to understand how the different pieces of an IoT system work together, and much more.
Tip
This is not an introductory book on Embedded Rust. I will explain the concepts needed for the examples, but I will not go into depth on fundamentals such as
no_stdin Rust or embedded concepts such as peripherals, ADC, and other basic topics.If you are just getting started with embedded systems and Rust, I recommend starting with my beginner-level book, Embedded Rust with ESP32, before reading this book.
Meet the Hardware
The ESP32-C5 is a RISC-V based System-on-Chip(SoC) from Espressif, with Wi-Fi 6 and Bluetooth Low Energy. It was announced in 2022 and entered mass production in 2025.
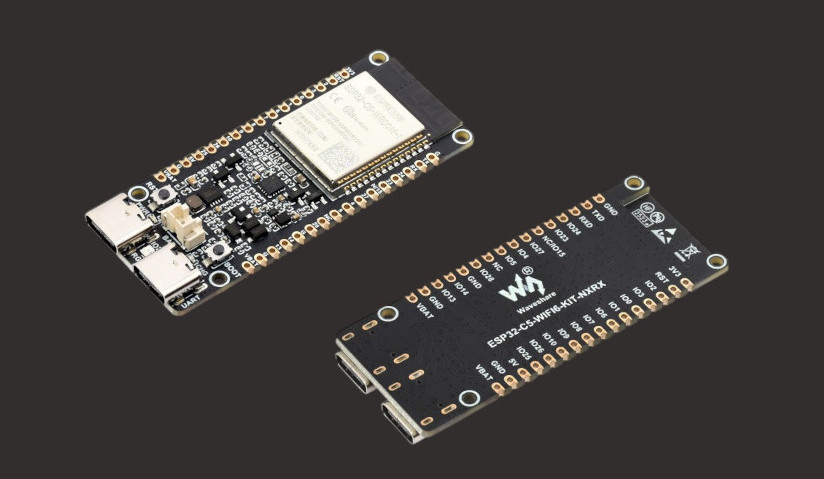
I am using the Waveshare ESP32-C5 WiFi 6 Kit N16R8 development board. You can use any ESP32-C5 development board from Espressif, such as the ESP32-C5-DevKitC-1, or from another manufacturer, as long as it uses the ESP32-C5 chip.
For the smoothest experience, I recommend using the same board or a board with a closely matching pinout and hardware configuration. If your board differs, you may need to adjust the pin assignments or other hardware-specific parts of the examples. We will go into more detail about the pins in the pinout section.
Why ESP32-C5?
When it comes to IoT, the ESP32 family is one of the most popular choices for hobbyists and makers. There are already many books covering variants such as the original ESP32 and ESP32-C3.
For this book, I wanted to work with a newer ESP32 chip. I was initially considering the ESP32-C6 but chose the ESP32-C5. One of the reasons I chose the ESP32-C5 was its support for 5 GHz Wi-Fi. The ESP32-C5 supports both 2.4 GHz and 5 GHz Wi-Fi 6, while the ESP32-C6 supports only 2.4 GHz Wi-Fi 6. The ESP32-C5 also has other advantages, such as PSRAM support, and its CPU frequency is 240 MHz compared to 160 Mhz on the ESP32-C6.
What to Do If You Have Another ESP32 Variant?
If you are not able to get the ESP32-C5 but already have another ESP32 variant, you can still follow along and learn the concepts. And you can try to adapt the examples for the board you have. It may not always be a smooth ride, but it can be a good learning experience.
Work in Progress
This book is currently under active development. New chapters will be added as I work through.
Support this project
You can support this book by starring this project on GitHub or sharing this book with others 😊
Datasheets
Here are the main datasheets:
In case a datasheet link is broken, you want to check the latest version, or you want to find other related documents, you can check the Related Documents section in the ESP32-C5-DevKitC-1 User Guide.
License
The “Building IoT Devices with Rust” book(this project) is distributed under the following licenses:
- The code samples and free-standing Cargo projects contained within this book are licensed under the terms of both the MIT License and the Apache License v2.0.
- The written prose contained within this book is licensed under the terms of the Creative Commons CC-BY-SA v4.0 license.
Disclaimer:
The experiments and projects shared in this book have worked for me, but results may vary. I’m not responsible for any issues or damage that may occur while you’re experimenting. Please proceed with caution and take necessary safety precautions.
Additional Hardware
In this section we will look at some of the extra hardware you might use along with the ESP32-C5.
Breadboard
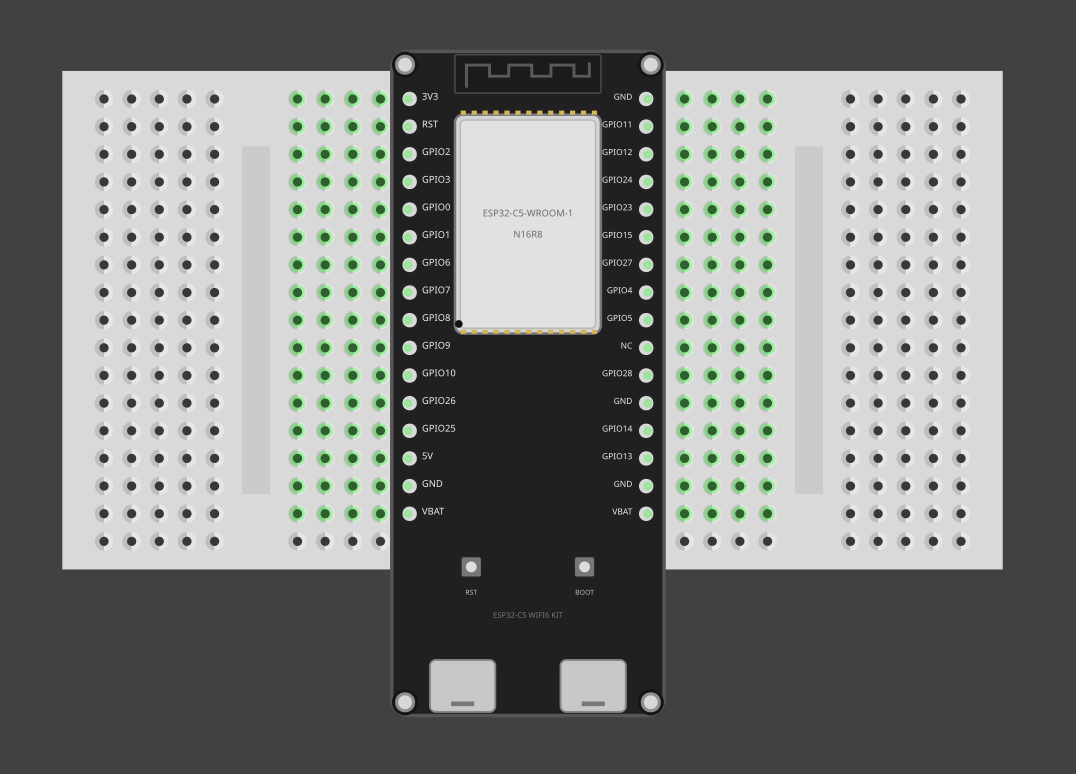
If you have worked with the ESP32 DevKit V1 board, or have seen my other book, you already know that the ESP32 DevKit V1 is too wide to fit on a standard breadboard. I solved this by using two mini breadboards.
The ESP32-C5 board is slightly narrower than the ESP32 DevKit V1, so it seems to fit on a standard breadboard. However, it leaves only one row of pins available on each side, which I don’t feel comfortable working with.
So, I am using my two mini breadboard setup again. I place the ESP32-C5 development board between the two mini breadboards and connect the pins on each side to the respective breadboard.
Pinout
The pinout of the Waveshare ESP32-C5-WIFI6-KIT board:
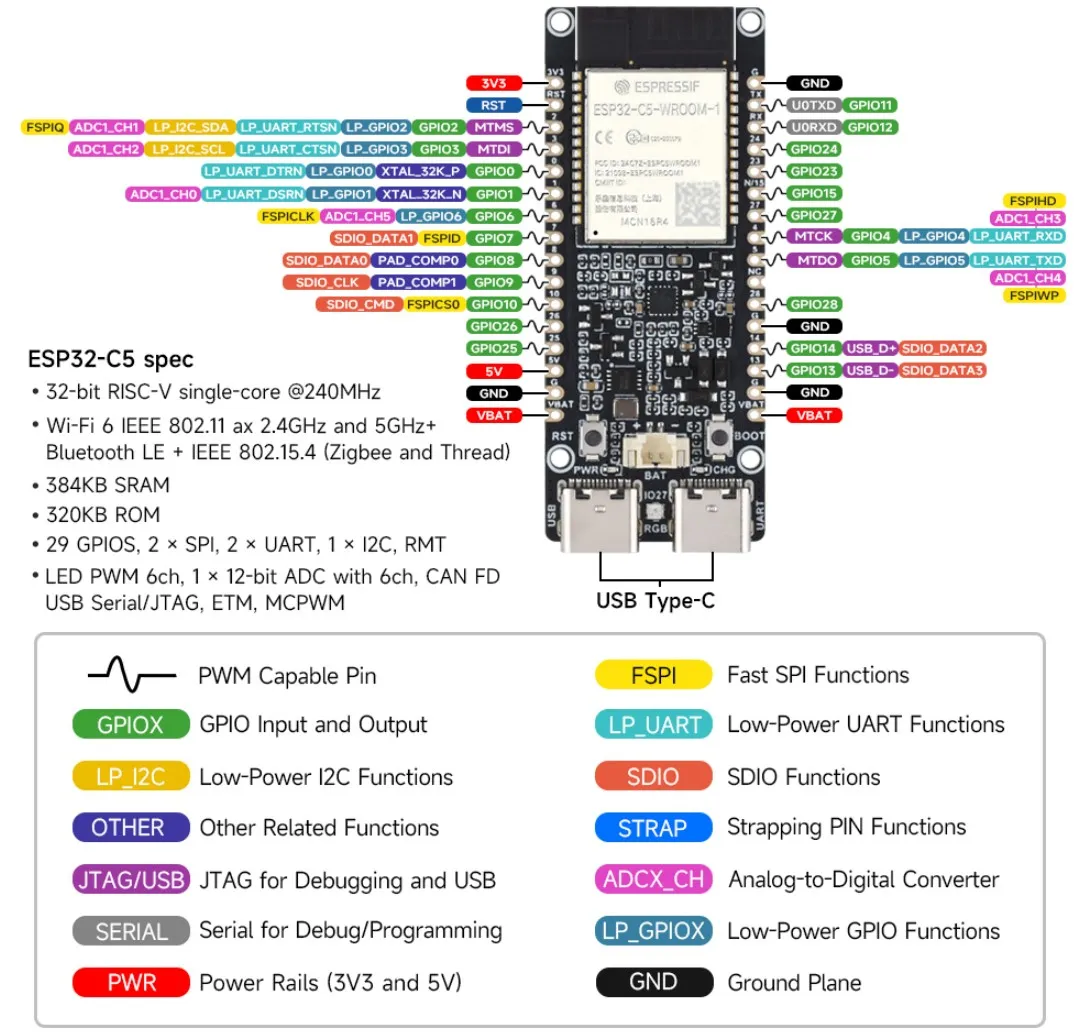
For the complete pin functions, refer to the Waveshare ESP32-C5-WIFI6-KIT documentation and the Espressif ESP32-C5 documentation.
Development Environment
The official docs provides more comprehensive setup instructions. However, I will quickly cover the essential tools and setup needed for our exercises. If you encounter any issues, refer to the official documentation for troubleshooting.
Rust toolchain
The ESP32-C5 uses a 32-bit RISC-V processor, so we can use the standard Rust toolchain. We do not need espup, which is used for ESP chips that require the Xtensa Rust toolchain.
Install the required Rust components:
rustup component add rust-src
rustup target add riscv32imac-unknown-none-elf
cargo-binstall
This is to install Rust binaries without building from source using cargo install or manually downloading packages, you can use cargo-binstall. We’ll use this tool to install the espflash tool next.
cargo install cargo-binstall
espflash
“espflash is a serial flasher utility, based on esptool.py, for Espressif SoCs and modules.” This will be the tool used (when we are not using probe-rs) to put our code into the device and run it.
cargo binstall espflash
If you encounter any problems, you can try installing the exact version used when this book was written.
cargo binstall espflash@4.6.0
After installation, type the espflash command to verify that it works.
espflash --version
Template by ESP-RS
We will be using the templates provided by ESP-RS, which offer two sets:
- esp-generate: A
no_stdtemplate. This is the one we will focus on most of the time. - esp-idf-template: A
stdtemplate.
esp-generate
The esp-generate tool is used for creating no_std applications. Currently, it supports the ESP32, ESP32-C2/C3/C6, ESP32-H2, and ESP32-S2/S3.
cargo install esp-generate --locked
If you want to follow the code exactly as it is in this project, install this esp-generate version used for generating the examples:
cargo install esp-generate@1.4.0 --locked
Creating project with esp-generate
For this book, we will be using the ESP32-C5. I highly recommend using the same hardware to make it easier to follow along.
esp-generate PROJECT_NAME
USB Access
On Linux, your user needs permission to access the USB serial port used by the ESP32-C5. Add your user to the dialout group:
sudo usermod -a -G dialout $USER
Log out and back in for the changes to take effect.
Quick Start - Hello Embedded!
Before getting into other concepts, let’s quickly check that our development setup is working and run our first Rust program on the ESP32-C5.
Setup project
To start the project, use the esp-generate command. Run the following:
esp-generate esp32c5-quick
This will open the configuration menu.
First, select ESP32-C5 as the target chip. Next, select ESP32-C5-WROOM-1/1U (8MB PSRAM) as the chip variant. In the “Flashing, logging and debugging (espflash)” section, enable defmt messaging.
For the remaining options, we will use the default settings. Save the configuration to generate the project. Just press s on the keyboard.
Alternatively, you can use the following command without using the TUI. This comes in handy when you already know all the options you want to use.
esp-generate --headless -o esp32c5 -o defmt esp32c5-quick
Program
I usually introduce a simple blinky program in the Quick Start section of my other books. However, in the case of the ESP32-C5 board, we can’t do that because the board has an addressable RGB LED instead of a standard LED. It cannot be controlled by simply toggling a GPIO pin between High and Low.
So, for this Quick Start, we will simply print a message using defmt.
We don’t need to make any changes to the generated program. We will only increase the delay between messages from 500 milliseconds to 5 seconds.
#[allow(
    clippy::large_stack_frames,
    reason = "it's not unusual to allocate larger buffers etc. in main"
)]
#[main]
fn main() -> ! {
    // generator version: 1.4.0
    // generator parameters: -o esp32c5 -o esp32c5-wroom-1-psram -o defmt

    let config = esp_hal::Config::default().with_cpu_clock(CpuClock::max());
    let _peripherals = esp_hal::init(config);

    loop {
        info!("Hello world!");
        let delay_start = Instant::now();
        while delay_start.elapsed() < Duration::from_millis(5000) {}
    }
}
Flash - Run Rust Run
All that’s left is to flash the code onto the ESP32-C5 and see the output.
Run the following command from your project folder:
#![allow(unused)]
fn main() {
cargo run
}
To run in release mode
#![allow(unused)]
fn main() {
cargo run --release
}
Once the program starts, you should see the Hello world! message printed every five seconds.
Help & Troubleshooting
If you face any bugs, errors, or other issues while working on the exercises, here are a few ways to troubleshoot and resolve them.
1. Compare with Working Code
Check the complete code examples or clone the reference project for comparison. Carefully review your code and Cargo.toml dependency versions. Look out for any syntax or logic errors. If a required feature is not enabled or there is a feature mismatch, make sure to enable the correct features as shown in the exercise.
If you find a version mismatch, either adjust your code(research and find a solution; it’s a great way for you to learn and understand things better) to work with the newer version or update the dependencies to match the versions used in the tutorial.
2. Search or Report GitHub Issues
Visit the GitHub issues page to see if someone else has encountered the same problem: https://github.com/ImplFerris/iot-book/issues?q=is%3Aissue
If not, you can raise a new issue and describe your problem clearly.
3. Ask the Community
The Rust Embedded community is active in the Matrix Chat. The Matrix chat is an open network for secure, decentralized communication.
Here are some useful Matrix channels related to topics covered in this book:
-
Embedded Devices Working Group
#rust-embedded:matrix.org
General discussions around using Rust for embedded development. -
ESP32 Development
#esp-rs:matrix.org
Focused on Rust development for the ESP32 family of chips. -
Debugging with Probe-rs
#probe-rs:matrix.org
For support and discussion around the probe-rs debugging toolkit. -
Embedded Graphics
#rust-embedded-graphics:matrix.org
For working withembedded-graphics, a drawing library for embedded systems.
You can create a Matrix account and join these channels to get help from experienced developers.
You can find more community chat rooms in the Awesome Embedded Rust - Community Chat Rooms section.
4. Discord
There is an unofficial Discord community for Embedded Rust where you can ask questions, discuss topics, share your experiences, and showcase your projects. It is especially useful for learners and general discussion.
Keep in mind that most HAL and embedded ecosystem maintainers are more active on Matrix. Still, this Discord server can be a good place to learn and interact with others.
Join here: https://discord.gg/NHenanPUuG
Onboard RGB LED
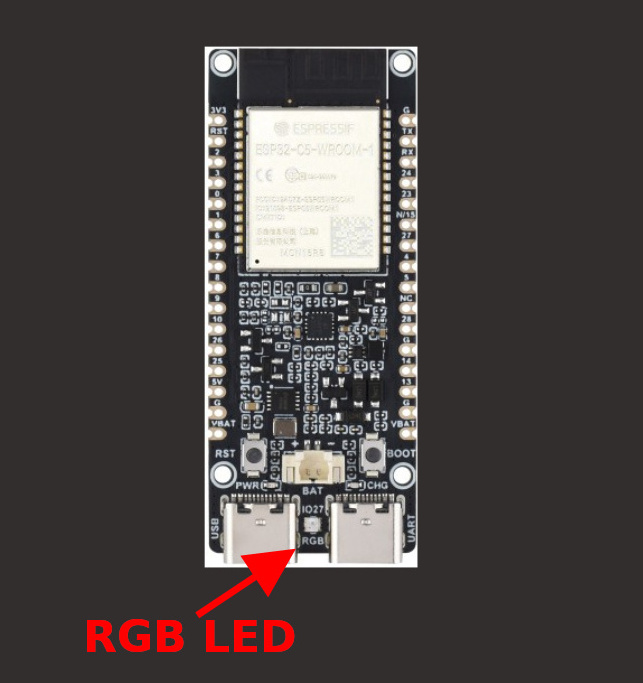
The ESP32-C5 board does not have a standard onboard LED. Instead, it has an addressable RGB LED connected to GPIO27. In a way, it is actually cool that our blinky program will be colorful. On the other side, for simple feedback where I use an onboard LED, I can’t use that simple way.
Let’s generate the project with esp-generate in headless mode.
esp-generate --headless -o esp32c5 -o defmt rgb-led
Dependencies
We will need two crates to work with the onboard RGB LED. The smart-leds crate provides a common interface for addressable LEDs such as WS2812 (NeoPixel) and APA102 (DotStar).
The esp-hal-smartled crate provides the ESP-HAL-specific implementation that uses the ESP32-C5’s RMT peripheral to generate the precise timing required by the WS2812B.
Add the following dependencies to your Cargo.toml:
esp-hal-smartled = "0.18.0"
smart-leds = "0.4.0"
Additional Imports
We will add the necessary imports. In future exercises, I may not add instructions to import when they are obvious. I always provide the finished project link, so you can check the imports there as well.
#![allow(unused)]
fn main() {
use esp_hal::rmt::Rmt;
use esp_hal::time::Rate;
use esp_hal::delay::Delay;
use esp_hal_smartled::{RmtSmartLeds, buffer_size, color_order};
use smart_leds::{RGB8, SmartLedsWrite};
}
Initialize RMT
First, let’s initialize the RMT peripheral. We will use an 80 MHz frequency.
#![allow(unused)]
fn main() {
let freq = Rate::from_mhz(80);
let rmt = Rmt::new(peripherals.RMT, freq).unwrap();
}
Configure the RGB LED
Next, we will configure the RMT channel to drive the WS2812B LED connected to GPIO27.
#![allow(unused)]
fn main() {
let mut led =
    RmtSmartLeds::<{ buffer_size::<RGB8>(1) }, _, RGB8, color_order::Grb>::new_with_memsize(
        esp_hal_smartled::WS2812_TIMING,
        rmt.channel0,
        peripherals.GPIO27,
        2,
        freq,
    )
    .unwrap();
}
The WS2812_TIMING provides the timing required by the WS2812B, while color_order::Grb specifies the order in which the LED expects the color values.
Main loop
Now we can use the write method to send RGB values to the LED. Let’s cycle through red, green, and blue with a 500 millisecond delay between each color.
#![allow(unused)]
fn main() {
 let delay = Delay::new();

loop {
    led.write([RGB8::new(255, 0, 0)]).unwrap();
    delay.delay_millis(500);

    led.write([RGB8::new(0, 255, 0)]).unwrap();
    delay.delay_millis(500);

    led.write([RGB8::new(0, 0, 255)]).unwrap();
    delay.delay_millis(500);
}
}
Clone the existing project
You can clone (or refer) project I created and navigate to the rgb-led folder.
git clone https://github.com/ImplFerris/esp32c5-projects
cd esp32c5-projects/rgb-led/
Run the program
Let’s flash the firmware and run it. If everything works, you should see the RGB LED cycle through red, green, and blue.
cargo run --release
I will avoid repeating this step in future exercises. If an exercise requires additional input, such as an environment variable, I will include the required command at that point.