Controlling the RGB LED via Wi-Fi
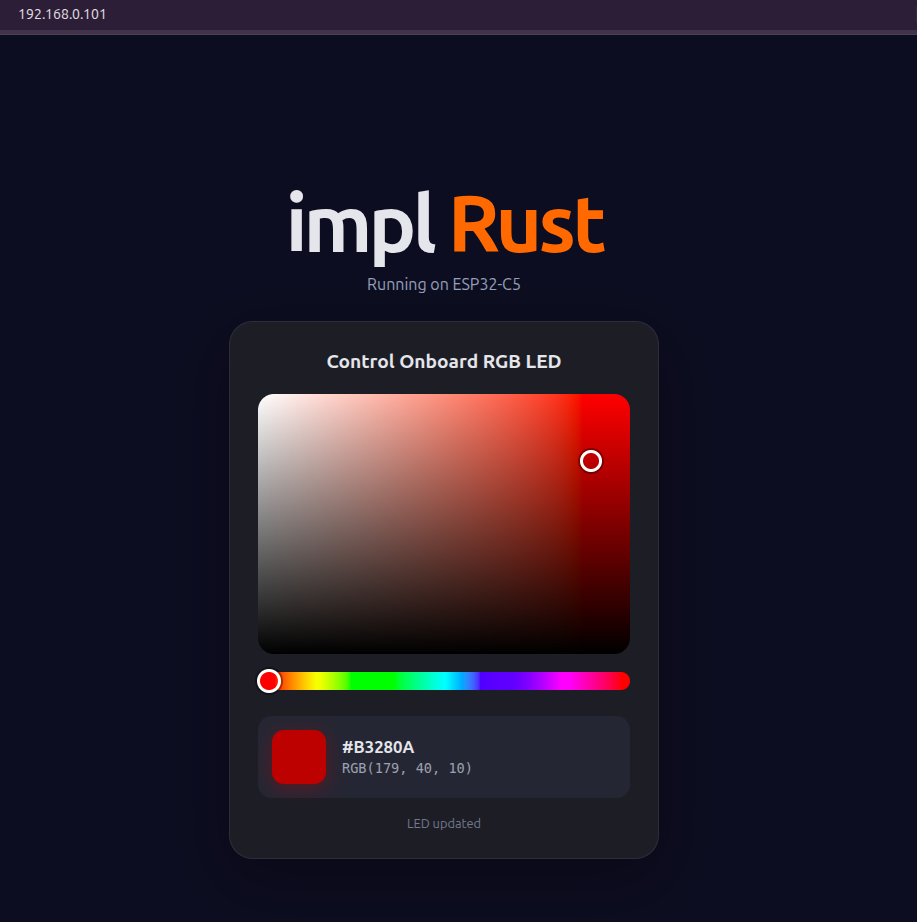
In this chapter, let’s extend the web server from the previous chapter. Instead of serving just a simple HTML page, we will create a web interface with a color picker that allows us to choose a color and change the onboard RGB LED.
Tip
If you get stuck or run into any import errors, you can refer to my project and navigate to the
rgb-web-controlfolder
Project Setup
You can clone the previous web-server project and build on top of it. We will additionally need the smart led crates for controlling the onboard RGB LED. The web page will send the selected color as JSON from JavaScript, so we need serde to deserialize the JSON in the backend. Update the dependencies as follows:
picoserve = { version = "0.20.1", features = ["embassy", "json"] }
serde = { version = "1.0.229", default-features = false, features = ["derive"] }
esp-hal-smartled = "0.18.0"
smart-leds = "0.4.0"

embassy-sync = "0.8.0"
The embassy-sync crate provides synchronization primitives and data structures with async support. We will use Signal from this crate. I will explain shortly why we need it, so for now, just add it.
We will also create an onboard_led module to make it easier to control the RGB LED on the board. The final project structure will look like this:
.
├── assets
│   └── index.html
├── build.rs
├── Cargo.toml
├── rust-toolchain.toml
├── src
│   ├── bin
│   │   └── main.rs
│   ├── lib.rs
│   ├── onboard_led.rs
│   ├── server.rs
│   └── wifi.rs
I have also removed the old index.html and logo.svg files from the assets directory and replaced them with a new index.html. You can download it from here.
Controlling Onboard RGB LED
We already worked with the onboard RGB LED in an earlier chapter. This time, we will wrap the LED setup in an OnboardLed struct so we can work with the RGB LED without dealing with the RMT or Smart LED configuration directly.
We used this code earlier in main when we initialized the Smart LED. I have extracted the values into constants to keep the code clean and easy to read. Instead of using the verbose RmtSmartLeds type directly, I created a type alias using the constants we need.
Filename: src/onboard_led.rs
#![allow(unused)]
fn main() {
use esp_hal::peripherals;
use esp_hal::rmt::Rmt;
use esp_hal::time::Rate;
use esp_hal_smartled::{buffer_size, color_order};
use serde::Deserialize;
use smart_leds::{RGB8, SmartLedsWrite};

const RMT_FREQ: Rate = Rate::from_mhz(80);
const BUFFER_SIZE: usize = buffer_size::<RGB8>(1);
type RmtSmartLeds =
    esp_hal_smartled::RmtSmartLeds<'static, BUFFER_SIZE, esp_hal::Blocking, RGB8, color_order::Rgb>;
}
Next, we define the structure of the color we will receive as JSON:
#![allow(unused)]
fn main() {
#[derive(Deserialize)]
pub struct Color {
    red: u8,
    green: u8,
    blue: u8,
}
}
The Deserialize derive allows Serde to convert the JSON request into a Color value.
We will create an OnboardLed struct to keep everything related to controlling the onboard RGB LED together. This gives us a simple interface for working with the LED while keeping the RMT and Smart LED details inside the module.
#![allow(unused)]
fn main() {
pub struct OnboardLed {
    led: RmtSmartLeds,
}

impl OnboardLed {
    pub fn new(
        rmt_peripheral: peripherals::RMT<'static>,
        led_peripheral: peripherals::GPIO27<'static>,
    ) -> Self {
        let rmt = Rmt::new(rmt_peripheral, RMT_FREQ).unwrap();
        let led = RmtSmartLeds::new_with_memsize(
            esp_hal_smartled::WS2812_TIMING,
            rmt.channel0,
            led_peripheral,
            2,
            RMT_FREQ,
        )
        .unwrap();

        Self { led }
    }

    pub fn set_color(&mut self, color: Color) {
        self.led
            .write([RGB8::new(color.red, color.green, color.blue)])
            .unwrap();
    }
}
}
LED Task
In Embedded Rust, peripherals are provided as singletons, so we can’t directly share the same peripheral across multiple tasks. In our case, this means the web server can’t directly control the RGB LED.
To solve this, we can use an embassy_sync::Signal to pass the selected color between tasks. A Signal stores the latest value sent to it and allows another task to wait for and receive that value.
Filename: src/onboard_led.rs
#![allow(unused)]
fn main() {

use embassy_sync::{blocking_mutex::raw::CriticalSectionRawMutex, signal::Signal};

pub static LED_SIGNAL: Signal<CriticalSectionRawMutex, Color> = Signal::new();

#[embassy_executor::task]
pub async fn led_task(mut led: OnboardLed) -> ! {
    loop {
        let color = LED_SIGNAL.wait().await;
        led.set_color(color);
    }
}
}
We create a Signal that can hold a Color. The web server will send the selected color through this signal, and the LED task will receive it.
The led_task takes the OnboardLed as an argument, so it is the task that owns the LED peripheral. It waits for a new color using LED_SIGNAL.wait().await. Once a color is received, it passes it to the set_color() function.
The task then goes back to waiting for the next color.
Then in the main.rs file, we first create an OnboardLed instance using the RMT and GPIO27 peripherals. We then pass this instance to led_task when spawning the task.
Filename: src/bin/main.rs
#![allow(unused)]
fn main() {
let onboard_led = OnboardLed::new(peripherals.RMT, peripherals.GPIO27);
spawner.spawn(onboard_led::led_task(onboard_led).unwrap());
}
Sending the Color to the LED Task
Now, we will update the web server code. We will remove the old /logo.svg route and add a POST route for /api/onboard-led:
Filename: src/server.rs
#![allow(unused)]
fn main() {
let app = Router::new()
    .route(
        "/",
        routing::get_service(File::html(include_str!("../assets/index.html"))),
    )
    .route("/api/onboard-led", routing::post(handle_color));
}
When the browser sends a POST request to /api/onboard-led, picoserve will call the handle_color function.
#![allow(unused)]
fn main() {
async fn handle_color(extract::Json(color): extract::Json<onboard_led::Color>) {
    onboard_led::LED_SIGNAL.signal(color);
}
}
The Json extractor deserializes the JSON request body into our Color struct. We then send the color through LED_SIGNAL using signal(). The LED task receives the color from the signal and updates the RGB LED.
Frontend Javascript snippet
This is the JavaScript part of the index.html file. It helps us send the selected color from the color picker to the ESP32-C5. The full code and logic are in the index.html file if you want to refer to them.
async function sendColor() {
    const [red, green, blue] = getRgb();

    status.textContent = "Updating...";

    try {
        const response = await fetch("/api/onboard-led", {
            method: "POST",
            headers: {
                "Content-Type": "application/json"
            },
            body: JSON.stringify({ red, green, blue })
        });

        if (!response.ok) {
            throw new Error();
        }

        status.textContent = "LED updated";
    } catch {
        status.textContent = "Failed to update LED";
    }
}
Run the Program
Once you run the program, you will see the web page shown below. Click the color picker and choose a color with your mouse. Once you release the mouse button, the selected color will automatically be sent to the ESP32-C5. You should see the onboard LED change to the selected color.
If the web page does not seem to load or the request fails, close and reopen the browser. We have only two web server tasks, so an existing browser connection may prevent a new connection from being established.